
Have you every thought about starting a classroom business, but didn’t know where to start? Depending on the skills and ability levels of your students, there are many avenues you can take when starting a business. Our class has run a productive ornament making business for a few years now. It’s not difficult to maintain, doesn’t require loads of extra effort on your part, the students love it, and it funds your classroom activities. You do need some start-up funds which you can likely acquire through grants. As a side note, if you’ve never applied for a grant or the prospect seems too daunting, keep an eye out for my next blog post. It’ll be all about applying for grants and I promise it’s easier than you may think.
((This blog post contains affiliate links for your convenience. You don’t pay any more by clicking my link (and I actually find the best prices for you!) but I make a small commission off of sales. This helps me to test out more materials and bring you more quality content. Thanks for supporting my little blog!))
How We Got Started
A few years ago, I attended a Special Education conference in our state. During that time, the conference had invited special education classroom businesses to sell their wares to attendees. I was absolutely amazed at the creativity of these students and their teachers. It caused me to start mulling some creative classroom business ideas around in my head. I spent a lot of time looking up craft ideas on Pinterest and knowing that we would likely make the majority of our money during the holidays, concentrated on ornaments. Another reason I chose ornaments is because the process of creating them worked well with the ability levels of my students. Ensuring that your students are able to actively participate is key when creating a classroom business.
Designing Your First Ornaments
After we got the approval to start our business from the School Board, we immediately began working on ornament designs. We knew we were going to be creating glitter ornaments, because they were simple yet beautiful. Plus, we live in a small southern town and know that glitter and sparkle are big here! We decided to focus on our high school and create two different ornaments using our school colors.
When coming up with your designs, I firmly believe you can’t go wrong starting out with simple ornaments using your school colors. Especially if you live or work in a small town like I do, the community tends to revolve around the local high school and is usually happy to support the students. Once people begin to know your craft and what you’re selling, you can start to branch out a bit and create ornaments that seem to be trending at the moment. If you want to know what’s popular, join any craft group on social media or even just scroll through Pinterest.

What Materials Do We Need?
When gathering the materials required to make the ornaments, start as early as possible. I’ve learned that the closer it gets to the holidays, the harder it is to find everything you need. Trust me, you don’t want to be scouring through stores one week before Christmas looking for clear glass ornaments, because you probably won’t find any. Through trial and error, we’ve learned what materials work and what don’t. I’ve listed everything that’s required below, using materials that we have found to the most effective.
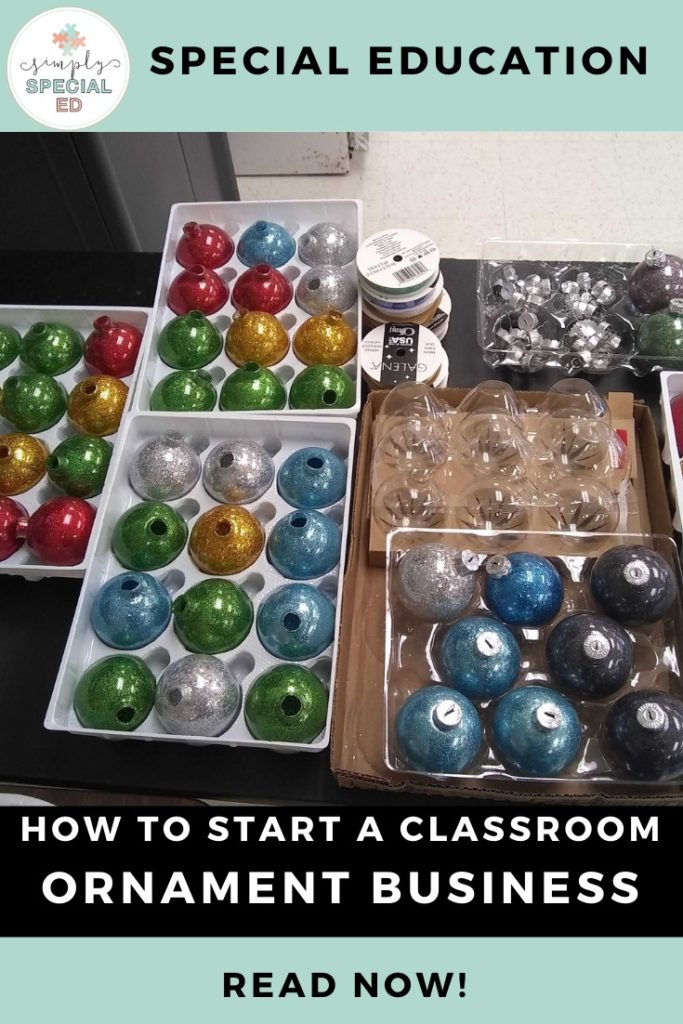
- 2.5” clear glass ball ornaments – Glitter and paint don’t stick to plastic as well as glass. It may look good at first, but we’ve noticed that after a week or so the paint starts to slide off the sides. This is especially true in high humid states. If you live in the western part of the country plastic may work just fine.
- Extra Fine Glitter – Make sure that you use extra fine glitter because it doesn’t get as clumpy as regular glitter does. Plus, it gives the ornament a more finished look.
- Super Glue – We use this to glue the ornament cap back on the ornament. We also use it to glue the ribbon to the cap.
- ¼” Ribbon – We’ve found this ribbon works best with the ornament size we use. However, if you aren’t planning on putting any type of vinyl on your ornament, a bigger size will look good.
- Mop & Glo – This is what we use to coat the inside of the ornament before adding the glitter. You can also use polycrylic, but mop & glo is cheaper and we’ve never had any issues with it.
- Cricut (optional) – Our class has been blessed to have a Cricut (thanks to a grant!), and we use it to cut out vinyl decals that we attach to the ornaments.
- Vinyl (optional) – If you choose to use a cricut to cut out decals for the ornaments, you’ll need vinyl. The ornaments are small, so depending on the size of the decal, one 12” sheet can cover 25+ ornaments.

The Ornament Making Process
Glittering the ornaments is quick and easy. I made a very simple step-by-step instructional using SymbolStix that my students can use to follow along. However, after the first round of monitored instruction they are usually able to continue independently. Cautionary Warning: The kids LOVE the glitter. Unless you’re willing to have your entire body and the classroom full of glitter, pay close attention to your students at all times.

(visuals are symbol stix)
Adding the glitter
You’ll start by pouring a small amount of Mop & Glo into the ornament. Swish it around until it covers the entire ornament – including the very top. Next, dump the excess liquid into an empty cup.
Tip: If you use the small mouthwash cups, you can set the ornament on the top and let the excess liquid drip out until you’re ready to glitter it.
You’ll then funnel a small amount of glitter into the bulb and swish it around the same way as the glue. Before you dump out the excess glitter, make sure there are no “bald spots” on the ornament. Finally, dump out the surplus glitter and let dry. We normally place the bulbs upside down in the container they came. Let the bulbs dry for 24hrs or so. This part goes by quickly, and depending on how many students you have, you can easily get quite a few finished in a short amount of time.
Bows & Glue
While the ornaments are drying, you can have the students work on tying the ribbon. The concept of tying a ribbon is more difficult for some of our students – especially with the size of the bow being so small. For those students who can’t tie, they can help measure and cut the ribbon. You can also have students help keep track of and sort the ornament caps. The final step is to superglue the ornament cap and ribbon together. We also superglue the ornament cap onto the ornament just to make sure that they don’t detach. As far the superglue is concerned, I would suggest having an adult do that. We’ve tried to don gloves on our students and have them assist, but we ended up with a bunch of plastic from the gloves stuck to the ornaments.

Vinyl
If you have access to a Cricut or other vinyl cutting machine, I would highly suggest this last step. We cut anchors since they represent our school and placed them on one side of the ornament. One the other side we put the name of our school mascot. As we got more comfortable making ornaments, we began to branch out a lot more with our creations.
We were even able to create an ornament that hung on our state’s Department of Public Instruction’s Christmas tree. Each of my students drew a symbol that represented our side of the state and we were able to turn each one into a file that the cricut was able to cut out. We then added it to an ornament, and it was a hit! That being said, the vinyl part of the ornament does fall mainly on the teacher. However, it adds much more depth and increases the sale price of the ornament.

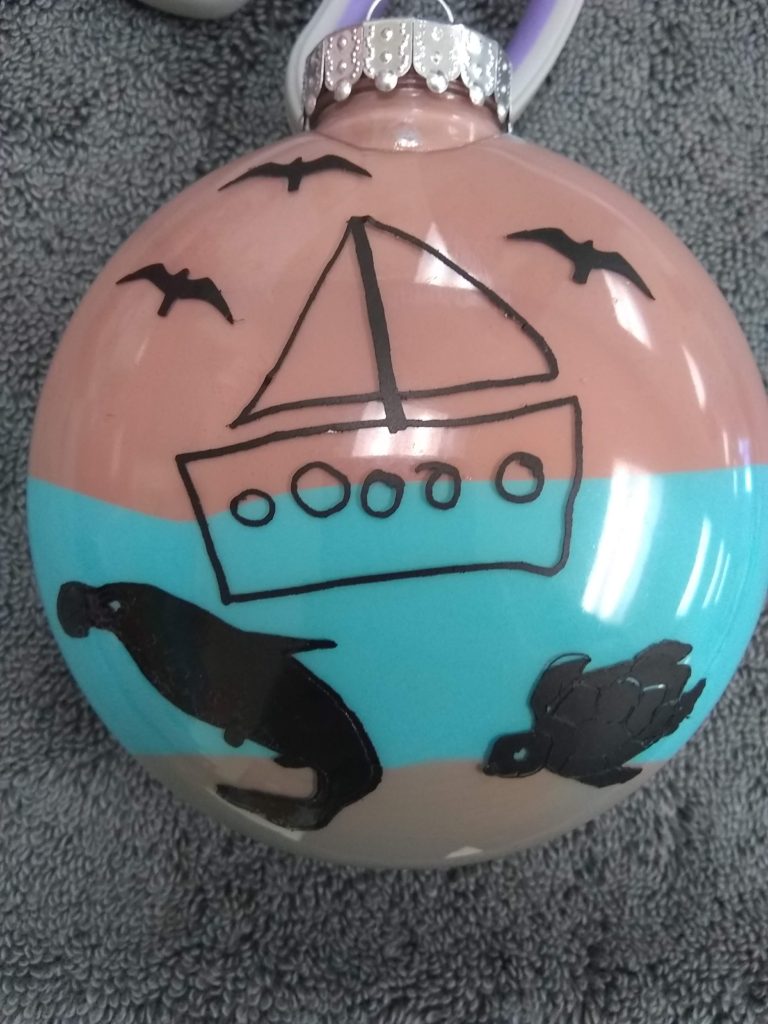
The ornament our classroom business designed for our
state’s Department of Instruction
Selling The Ornaments
We started off small, selling only to teachers, students, and family members of students at our high school. However, before we knew it, things took off and we were able to sell ornaments that were unique to the other two high schools in our county.
By then, word had gotten out about our business, so we decided to sign-up to sell some of our ornaments at a local craft fair. We created a variety of ornaments and sold almost every single one that day. We sell all of our ornaments for $5 a bulb, which gives you a profit of over $4.00 a bulb. Every so often we make more unique ones, such as the ornament that we made for the Department of Public Instruction. We sell those for $10 because they are a lot more work.
My suggestion would be to use social media to get the word out there. Create flyers and send out emails. I mentioned this in a previous post, but make sure you set a maximum limit on how many ornaments you’re willing to create. When we first started with our glitter ornaments, thanks to social media, we literally had hundreds of orders. Eventually, we had to start turning people away because not only did fulfilling those orders become overwhelming to us teachers, but our students were so over it, too. What started out as fun opportunity turned into a chore very quickly.
If you’re ready to start your own ornament business or have more questions, comment below. I’ll be more than happy to help you out, give you ideas, or just encourage you as you start-up.

((This blog post contains affiliate links for your convenience. You don’t pay any more by clicking my link (and I actually find the best prices for you!) but I make a small commission off of sales. This helps me to test out more materials and bring you more quality content. Thanks for supporting my little blog!))


Love this! Thank you for sharing.
What an awesome idea! This is so cool! We do a classroom business in my elementary special education classroom. We sell decorated dog treats (Milkbones dipped in almond bark and covered in sprinkles) at Christmas time. My students love it and the staff at our school can’t wait to put their order in.